How I Convert Plain Text into Publish-Ready Files Using Pandoc
This is Part 3 of my short series: From Draft to Published — a minimalist guide to writing, formatting, and publishing your book without overwhelm. Start with Part 1 here.
So far in this series, I’ve shared the simple text-based workflow I use to write and format my books using Markdown and plain folders.
Think Human is a reader-supported publication. To receive new posts and support my work, consider becoming a free or paid subscriber.
But how do you turn all those `.md` files into a finished book? That’s where Pandoc comes in.
Pandoc is a powerful document converter that can transform your plain text files into professional-quality formats like:
-
PDF (for print or shareable files)
-
EPUB (for e-readers like Kindle)
-
DOCX (for sharing with editors or collaborators)
-
HTML (for web publishing)
Best of all, Pandoc is free, open source, and works on macOS, Linux, and Windows.
First: Get Pandoc Installed
Installing Pandoc is easy, and if you’re a more tech-savvy user on Mac or Linux, you can install it with a package manager like Homebrew or apt.
Whatever platform you’re on, you can find Pandoc installation instructions for it here.
Prepare Your Book Folder Structure
Before you enter any commands, I suggest setting up your book project’s folder structure something like this:
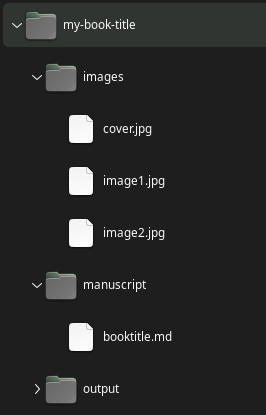
- manuscript/ — where you keep your Markdown chapter files
- images/ — where you store things like cover images
- metadata.yaml — your book’s information
- output/ — where Pandoc will save your finished files
About Combining Chapters into One Book File
If you write each chapter as its own file, use this command. Be sure the file locations match your actual setup:
pandoc manuscript/*.md -o output/book.pdf
If you wrote your book in one big file (like me), the command will look like this:
pandoc manuscript/mybook.md -o output/book.pdf
2. Create a Simple Metadata File
Create a file called metadata.yaml, and add this to it:
title: My Book Title                                               author: Jane Writer
date: 2024-05-01                                                language: en-US                                                   copyright: © 2025 Jane Writer
You’ll use this file during export.
3. Export to PDF
You’ll specify the input file (your book file or book chapter files), the metadata file to use, and the output file name and location.
Switch to your book’s directory (the my-book-title folder shown above), and use this command.
pandoc manuscript/*.md --metadata-file=metadata.yaml -o output/book.pdf
NOTE: PDF export requires a LaTeX engine like TeX Live or MacTeX.
4. Export to EPUB
You’ll specify the input file (your book file or book chapter files), the metadata file to use, the image to use as a cover image, and the output file name and location.
pandoc manuscript/*.md --metadata-file=metadata.yaml --epub-cover-image=images/cover.jpg -o output/book.epub
5. Export to DOCX
Like with PDF, you’ll specify the input file (your book file or book chapter files), the metadata file to use, and the output file name and location.
pandoc manuscript/*.md --metadata-file=metadata.yaml -o output/book.docx
Summary
The basic steps are:
-
Write your book files and gather your cover image and other image files.
-
Create a folder structure for your book and put your book and images files there, like the example above.
-
Create a yaml file with basic book information.
-
Using Pandoc, enter commands to convert your Markdown book document(s) into whichever formats you choose.
For more details on entering Pandoc conversion commands, see Pandoc’s excellent documentation.
In a future post, I’ll explain how I take all of this even further, automating much of the process.
Questions? Curious about something I mentioned here? Please reply or leave a comment—I’d love to know what part of this feels interesting (or intimidating), and I’ll try and answer any questions you have.
Think Human is a reader-supported publication. To receive new posts and support my work, consider becoming a free or paid subscriber.